

Seamlessly expand partition into free space
This particular procedure only works when there is free space right after the partition you are working on - then you can do these steps:- Expand the virtual volume
- Expand the partition in the OS
- Expand the logical volume
- Expand the file system
Not going to claim that this is universally fit for all scenarios - but very common for myself - and i found it perfectly safe for a root ext4 file system - i never tested on a root XFS, but i done it "live" on a secondary mounted xfs partition. I usually use Ubuntu Server, but i imagine most distros are similar. All the commands below must be run with sudo (or as root). Example uses /dev/sdb and other names for these examples, adjust to fit.
- You need to know what physical disk is your LVM physical disk, and what volume group and logical volume you are using. Some commands to find that stuff
- lvmdiskscan will show you physical partitions and what they are
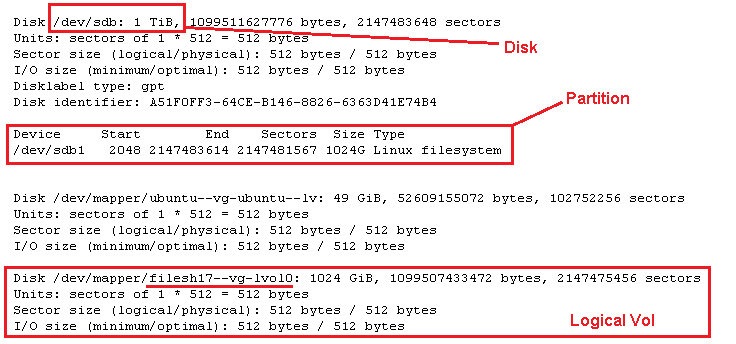
- fdisk -l will show you the disk, partitions, and logicals - the first thing we are looking for is the disk itself - /dev/sdb in this case
- pvdisplay lists the physical configured volumes
- vgdisplay lists the volume groups
- lvdisplay lists the logical volumes
- Expand your virtual drive (in virtualbox or vcenter or similar, just up the space of the drive)
- Refresh disk info in Kernel, a reboot will take care of it, but why restart if we dont need to? - this can sometimes be tricky - many say that partprobe should do it, i have found it does not always work, but this command usually works fine:
echo 1 > /sys/block/sdb/device/rescan - Start the parted prompt
parted /dev/sdb - Attempt to print the current disk and partition info
print - This should now prompt you something like this:
Warning: Not all of the space available to /dev/sdb appears to be used, you can fix the GPT to use all of the space (an extra 1073741824 blocks) or continue with the current setting
Fix/Ignore? - Type F to fix - the disk and partition table is now updated. Do the list command again to verify
Print 
You should now see the disk as the new size, and the partition as the original size (in my case, 2TB disk, 1TB partition)- Resize the partition to fill 100% - make sure the partition number matches
resizepart 1 100% - Now verify that the partition did in fact change, then exit the parted prompt
print
quit - This step should not be needed, but doesnt hurt anything, some say you need it in certain situations, i dont believe them but i do it anayway - refresh partition info:
partprobe - List your physical LVM device to verify what you are working on
pvdisplay - issue a resize command to LVM, the physical LVM device will grow to use the full partition
pvresize /dev/sdb1 - List your physical LVM device again to verify changes applied
pvdisplay - List your logical volumes to verify what you are working on
lvdisplay - Resize your logival volume to fill what is available of the volume group
lvresize -l +100%FREE /dev/filesh17-vg/lvol0 - List your logical volumes again to verify the resize
lvdisplay - Resize your file system
- ext4: resize2fs /dev/filesh17-vg/lvol0
- xfs: xfs_growfs /dev/filesh17-vg/lvol0
- Done - verify with
df -h
Expand with additional physical device added to group
For all practical matters - this is probably more applicable to systems that have been used beyond its intended specs, and you need to add space to a partition or area that does not have the ability to simply grow more free space in place next to the partition needing it. Here are the steps:- Add device for more space, or expand space
- In OS, Configure partition for new space so it is usable by LVM
- Extend volume group with the new device
- Extend logical volume
- Extend file system
In the example I have a system with one disk, /dev/sda and it has been partitioned this way
- 200MB /dev/sda1 ext4 /boot
- 475GB /dev/sda2 physical for LVM
- 12GB /dev/sda3 swap
There is one volumegroup configured /dev/konjakk-vg with 3 logical volumes
/dev/konjakk-vg/lvroot 5GB ext4 on /
/dev/konjakk-vg/lvvar 70GB ext4 on /var
/dev/konjakk-vg/lvhome 400GB ext4 on /home
The root / partition is almost full and need more space. If situation allows, you could expand /dev/sda, add another partition to it, and mark as a physical device for LVM (like /dev/sda4). But for the purpose of this example, so that it be compatible with physical hardware, we will be adding a new 200GB disk /dev/sdb.
- You need to know what physical disk is your LVM physical disk, and what volume group and logical volume you are using. Some commands to find that stuff
- lvmdiskscan will show you physical partitions and what they are
- fdisk -l will show you the disks and partitions
- pvdisplay lists the physical configured volumes
- vgdisplay lists the volume groups
- lvdisplay lists the logical volumes
- Add your disk (or space) to the system, partition the new space so it is of type for use by LVM - here is an example using fdisk on /dev/sdb
- partprobe
- fdisk /dev/sdb
(Write new partition table if needed, GPT preferred) - n : add new partition #1 - follow prompts, use entire disk
- t : change type to Linux LVM (8e)
- w : write and exit
- Use fdisk -l or lvmdiskscan to verify your new device is showing - /dev/sdb1 on our example
- When you have a device ready for LVM use, tag it as a physical device with LVM
pvcreate /dev/sdb1 - Now extend your volumegroup with this device
vgextend konjakk-vg /dev/sdb1 - Now extend you logical volume
lvextend -l +100%FREE /dev/konjakk-vg/lvroot - Of course, you could use lesser space than all, only extend it by a certain GB size, then leave the rest of the space to be used by other logical volumes when you need it, you could do this:
lvextend -L +50G /dev/konjakk-vg/lvroot
lvextend -L +100G /dev/konjakk-vg/lvvar
and still have 100GB available in the group - Resize your file system with one of these:
- ext4: resize2fs /dev/konjakk-vg/lvroot
- xfs: xfs_growfs /dev/konjakk-vg/lvroot
- Done. Verify with
df -h
(Disclaimer, it has not been tested on a root file system of type xfs)
Comments
Post a Comment