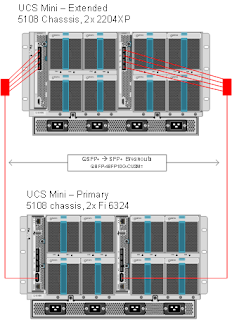
If you happen to own a UCS Mini Setup, a 5108 Chassis with two Fi 6324 or similar, and you are looking for documentation on how to add another 5108 Chassis with fabric extenders (2204XP in my case), then Cisco really does not have much out there, nor is there a lot of googlable information either (Everything you find is related to standalone Fabric Interconnects and "standard" UCS). Even after calling TAC, it took a while to get something, and what they told us was not even accurate. So here is how we did it, and it worked, came up without any interruption to current chassis, network, or running profiles.
Here is the simple diagram of how the wiring was done with ethe QSFP Breakouts.
Equipment
Of course we used our Cisco vendor to spec the equipment, but just for reference here is the list of what we had and what we added:- Original Setup
- 5108 Chassis
- Fi 6324 (Qty 2)
- Ports 1-2 for Fibre Channel, and 3-4 for Ethernet (MMF)
- Connected to a stack of switches and pair of FC switches/SAN
- Running UCS version 4.0.1 (Fairly recently upgraded as of May 2019)
- Added Equipment
- 5108 Chassis
- 2204XP (Qty 2) Fabric Extenders
- QSFP to 4SFP Breakuout cable (Qty 2)
- Scalability Port Enablement License for existing Fi6324 (Qty 2) (Allows usage of the QSFP)
Procedure
This ended up being quite simple - it was the uncertainty of doing it in a way that would not impact anything that had us fumbling for documentation. In the end it is pretty painless and straight forward:- Obtain the llicense file from Cisco, we had a PAK imported to the Cisco portal, then generated Lic files with the FI Serial numbers
- Apply the licenses in UCS UI.
- Admin, Licensing
- Fabric Interconnect A
- Click Download License, Choose the Lic file and off you go
- Click on Installed Licenses Tab, you should see the "SCAL_ETH_PORT_ACTIVATION_PKG" or similar with expiry Never
- Repeat for Fi B
- Rack your Chassis, install fabric extenders (And server blades if you have them).
- Wire up the extenders
- The QSFP (Scalability port 5) in Fabric A on primary chassis, to Port 1/2/3/4 on the extended chassis XP A (Left)
- The QSFP (Scalability port 5) in Fabric B on primary chassis, to Port 1/2/3/4 on the extended chassis XP B (Right)
- Plug in power to the extender chassis
- Bootup will take a while - give it 10 minutes
- In UCS UI, go to Equipment, Click on Fabric Interconnect A node
- Select the Physical Ports Tab
- Expand the Fixed Module and Scalability Port 5
- If these ports are showing As up and enabled you can skip the next step
- Right click on each of the 4 ports, one at the time, click "Configure as Server Port"
- Go to Equipment, Click on Fabric Interconnect B node
- Select the Physical Ports Tab
- Expand the Fixed Module and Scalability Port 5
- If these ports are showing As up and enabled you can skip the next step
- Right click on each of the 4 ports, one at the time, click "Configure as Server Port"
- If you did not have to manually configure the ports as server ports above, it may be related to the setting in Equipment, Policies, Port Auto-Discovery, Auto Configure Server port being set to enabled. This was not enabled in our system, and we left it as is and just enabled all the ports manually.
- As soon as the ports are enabled, Chassis 2 (extended) should start showing up. It may take quite some time before this is all set, as it performs Firmware upgrades on the fabric extenders and takes care of a lot of things, then does discovery - you will see several warnings and issues for a while till it is all done. Let it sit for an hour probably - after that, things should show up and hopefully be all error free.
- At the root of Equipment you should now see your second chassis and be good to go
Here is the simple diagram of how the wiring was done with ethe QSFP Breakouts.


Comments
Post a Comment